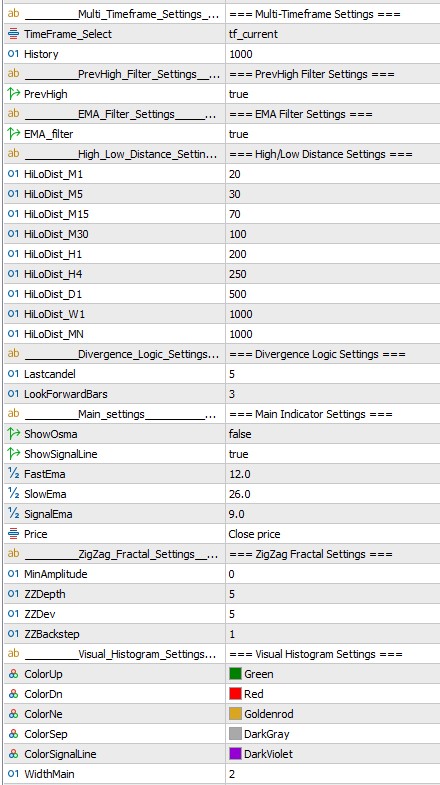
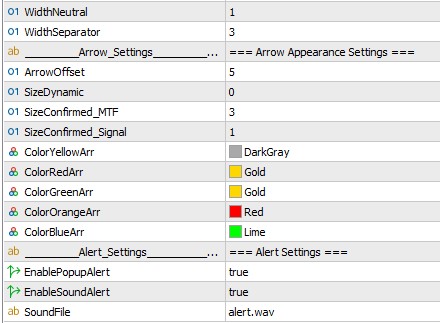
Deep MTF Divergence No Repaint Pro - settings
Deep MTF Divergence No Repaint Pro — Professional Market Intelligence for Stock Market, Crypto and Forex Traders
Multi-Timeframe Divergence Indicator with a No-Repaint Snapshot Engine. On the close of every lower-timeframe candle, it fixes the exact state of the higher timeframe and never redraws it again.
What the Indicator Shows
Deep MTF Divergence No-Repaint Pro builds a MACD/OsMA momentum histogram on the timeframe set in TimeFrame_Select and checks it against ZigZag/fractal price extremes to catch regular bullish and bearish divergence. Each setup unfolds through three clearly separated stages — a grey warning, a gold "get ready" arrow, and a final red or green confirmed signal — so you can watch it build in real time and only act once it is fully confirmed. See exactly how the no-repaint engineon lower timeframes works below.
Multi-Timeframe Divergence Engine
Every closed candle on your lower timeframe becomes a live visualization of what is currently happening inside the still-open TimeFrame_Select candle — the higher timeframe.
No-Repaint by Design
When your chart runs on a timeframe lower than TimeFrame_Select, every closed chart bar permanently fixes the state of the still-open TimeFrame_Select candle at that exact moment — a snapshot that is never recalculated, which is why the indicator never repaints.
Three-Stage Arrow Confirmation
Every divergence setup is shown as it develops: a grey warning arrow, then a gold "get ready" arrow, and finally a red (sell) or green (buy) confirmed, no-repaint arrow once the selected-timeframe bar actually closes.
High/Low Distance Filter
Each timeframe has its own HiLoDist value, in points, automatically matched to TimeFrame_Select. Price has to clear the zone's ZigZag+5-bar fractal extreme by this full distance before a setup is allowed to progress from a grey warning into a gold "get ready" arrow, and later into a confirmed signal — filtering out marginal, noise-level breaks.
PrevHigh Filter
UsePrevHighFilter adds a bar-over-bar momentum check: the histogram reading must be weaker than the reading fixed on the immediately preceding bar — confirming momentum is fading step by step, not just weaker than the peak of the current zone, adding a second, independent divergence check.
EMA Signal Filter
UseEmaFilter only confirms a signal once the histogram has also crossed its own Signal EMA in the expected direction, adding a third, independent divergence check.
The Core Mechanic: TimeFrame_Select State Fixed on Every Lower-Timeframe Close
This is the defining mechanic of Deep MTF Divergence No-Repaint Pro, and the reason it never repaints on lower timeframes. If your chart is running on the same timeframe as TimeFrame_Select, none of this applies — the indicator simply reads that timeframe's own closed bars, exactly like a normal MACD/OsMA. The moment your chart is on a timeframe lower than TimeFrame_Select, the real feature switches on: on the close of every bar of your chart, the indicator takes that bar's own close price and feeds it into the fast/slow EMA calculation as if it were the closing price of the still-open TimeFrame_Select candle right now — fixing exactly what that not-yet-closed higher candle looks like at that precise instant. In other words, every closed candle on your lower timeframe becomes a live visualization of what is currently happening inside the still-open TimeFrame_Select candle — the higher timeframe.
- That reading is fixed once, for that specific lower-timeframe bar, at the exact moment it closes — and is never recalculated or overwritten afterwards. This is precisely why the indicator does not repaint on lower timeframes: every already-closed bar keeps the
TimeFrame_Selectsnapshot it was given the instant it closed. - Practical example: trade M5 with
TimeFrame_Selectset to H1 — on the close of every M5 candle, the state of the still-open H1 candle is fixedat that exact moment. Twelve times per hour you see the current state of the H1 candle.
Trade M1 withTimeFrame_Selectset to M30 — on the close of every M1 candle, the state of the still-open M30 candle is fixed at that exact moment. Thirty times per M30 bar you see the current state of the M30 candle, instead of once.
| Why it matters for divergence | Divergence setups are time-sensitive — the earlier you see the TimeFrame_Select candle starting to lose momentum, the earlier you can prepare. This mechanic lets you see that shift the moment it happens on your own, lower-timeframe chart, instead of waiting for the TimeFrame_Select bar itself to close. |
|---|---|
| Why it doesn't repaint | Each already-closed lower-timeframe bar permanently records the state of the TimeFrame_Select candle exactly as it was the instant that bar closed. That snapshot is never recalculated afterwards. |
Three-Stage Arrow Logic — Warning, Get Ready, Signal
Each divergence setup is checked on every closed bar of your current chart and passes through up to three stages, colour-coded so you always know how mature a setup is:
| Start — Grey Arrow Appears | The grey arrow is plotted the moment price breaks beyond the zone's ZigZag+5-bar fractal level while the still-forming selected-timeframe candle is still trending in its original direction: a new high with weaker momentum flags a possible bearish (SELL) setup, shown with down-pointing arrows above the histogram, while a new low with weaker momentum flags the mirrored bullish (BUY) setup, shown with up-pointing arrows below the histogram — the earliest possible heads-up that a divergence may be forming. |
|---|---|
| From Warning to Get Ready | The jump from grey to gold requires two extra conditions at once: price must clear the ZigZag+5-bar fractal extreme by the full HiLoDist value for the active timeframe, and the still-open selected-timeframe candle's fixed state must flip direction relative to its own open. |
| From Get Ready to Signal | The gold arrow only becomes a confirmed red/green arrow once the selected-timeframe bar closes and its final close price confirms the same reversal — plus, if enabled, the PrevHigh and EMA filters both agree. |
High/Low Distance Filter Settings
Each timeframe from M1 to MN has its own independent HiLoDist value, in points, automatically selected to match the TimeFrame_Select input. This is the minimum distance a price extreme must clear the zone's ZigZag+5-bar fractal level by before the setup is allowed to progress from a grey warning into a gold "get ready" arrow, and later into a confirmed signal — scaled from a tight M1 setting up to a wide MN setting so the filter always matches the volatility of the timeframe you're trading.
| HiLoDist_M1 / M5 / M15 / M30 | 20 / 30 / 70 / 100 points by default — tight thresholds suited to intraday noise levels. |
|---|---|
| HiLoDist_H1 / H4 | 200 / 250 points by default — wider thresholds for swing-level moves. |
| HiLoDist_D1 / W1 / MN | 500 / 1000 / 1000 points by default — sized for daily and higher timeframe swings. |
| Where it applies | Used identically for the gold "get ready" arrow (against the live, still-forming selected-timeframe bar) and for the confirmed red/green signal (against the selected-timeframe bar's final high/low), so both stages are held to the same distance requirement. |
PrevHigh & EMA Filter Settings
| UsePrevHighFilter | Adds a bar-over-bar momentum check on top of the divergence pattern itself. For the gold "get ready" arrow, it requires the histogram reading on the current bar to be weaker than the reading fixed on the immediately preceding bar of your own chart. For the confirmed red/green arrow, the same check is applied one level up: the histogram of the selected-timeframe bar that has just closed must be weaker than the histogram of the selected-timeframe bar right before it. Either way, the filter confirms that momentum is genuinely fading step by step — not merely weaker than the peak of the current zone. |
|---|---|
| UseEmaFilter | When enabled, a confirmed signal also requires the histogram to have crossed its own Signal EMA in the expected direction by the moment of confirmation, adding a third, independent momentum check before the confirmed arrow is drawn. |
How to Download and Install
- 1
Get the file. After purchase you'll receive
Deep MTF Divergence No-Repaint Pro.ex5for instant download. - 2Open the Data Folder. In MT5, go to File → Open Data Folder, then
MQL5 → Indicators. - 3Copy the file into the
Indicatorsfolder. - 4Restart MT5 (or right-click Indicators in Navigator and choose Refresh).
- 5Attach it to a chart from Navigator → Indicators.
- 6
Configure settings — The default settings are ready to go — just click OK. If you want to adjust parameters first, check the manual.
Frequently Asked Questions
What exactly do I get when I buy?
A compiled, ready-to-run Deep MTF Divergence No-Repaint Pro.ex5 file for instant download, plus the PDF user manual. It installs like any standard MT5 indicator — no coding or extra setup required, and the default settings are ready to trade out of the box.
Is this a one-time payment, or a subscription?
One-time purchase. You pay once, download instantly, and keep the indicator for good — including free updates going forward.
Will it actually repaint on me after I've acted on a signal?
No. The confirmed red/green arrow is only ever plotted using the selected-timeframe bar's final, closed open/high/low/close — never a still-forming value. Once that arrow is drawn it is never moved or removed on any later tick or bar.
What do the grey, gold and red/green arrows mean for how I'd actually trade this?
They give you three separate decision points instead of one blind signal. Grey is the earliest heads-up that a divergence may be building — useful for getting your attention, not for entering. Gold means the setup has cleared the distance filter and the higher-timeframe candle has turned — worth watching closely. Red (sell) or green (buy) is the final, confirmed, no-repaint signal, plotted only after that higher-timeframe bar has actually closed — the point most traders will use to act.
Do the PrevHigh and EMA filters actually cut down false signals, or just add clutter?
Both are optional, independent momentum checks layered on top of the base divergence pattern — not decoration. UsePrevHighFilter requires momentum to be fading step by step, bar over bar, not just weaker than the zone's peak. UseEmaFilter requires the histogram to have crossed its own Signal EMA in the expected direction. Run either, both, or neither — turning them on trades fewer, stricter signals for more confirmation; turning them off trades more signals, earlier.
Which broker, symbols and account type does it work on?
It works on any MT5 broker, on any symbol your terminal can chart — Forex, indices, metals, crypto CFDs — since it's built entirely from standard price and time series data, not on any broker-specific feed. It runs identically on demo and live accounts.
Does TimeFrame_Select have to be higher than my chart?
No. If your chart is already on the same timeframe as TimeFrame_Select, the indicator simply works with that timeframe's own bars, and no other timeframe is used at all. The "fixed snapshot" mechanic only switches on when your chart is on a timeframe lower than TimeFrame_Select — that's the main, most useful case, since it lets you see a higher timeframe's momentum state on every closed candle of your own, lower chart.
Will this slow down my charts or conflict with my other indicators/EAs?
No. It's a self-contained indicator that only reads price data and draws its own buffers and objects — it doesn't modify your chart, other indicators, or any EA running alongside it.
I don't fully understand a setting — is there support?
Yes. The PDF manual included with your purchase walks through every input, and you can reach out with any setup question before or after buying - Contact US
— Trade Divergence with Confidence